

6 Easy Steps on How to Set Up AnaRIP for Your First Prints
Total Time Needed: 8 minutes
Required Tools:
- PC with AnaRIP installed
- Ricoh Ri 1000 DTG Printer
Things Needed?
- Your Graphic
Steps to configure the How-to Schema widget:
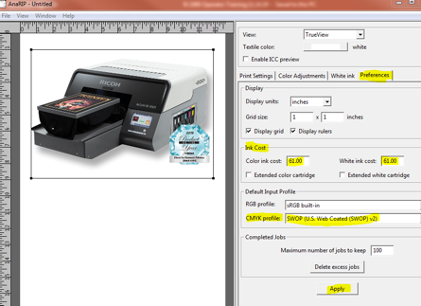
The first step to ensuring your graphics print as expected is to make sure your RIP preferences are set properly. AnaRIP is designed to operate multiple printer types, so selecting the correct printer and color profiles that match your device is essential. To start, go to the “preferences” tab in AnaRIP. Here you can input the cost of ink for accurate pricing and select the correct color profile. For the Ri 1000, you should have SWOP selected as your profile.

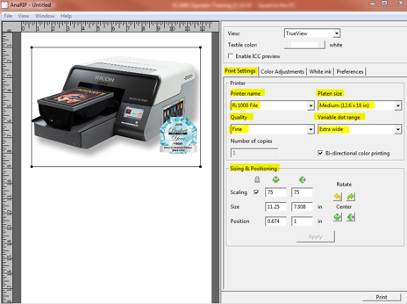
Once you’ve set the proper preferences, move to the “Print settings” tab. This is where you can select where to print, and properly size and position your graphic. This is also where you will select the color pass quality and drop size. We find that for most graphics and substrates, quality should be set at “Fine” and dot range set to “Wide” or “Extra Wide”
If you’re printing on a white or light-colored shirt, you can jump to step 5 and hit print. Then enjoy the result!

If you’re printing a colored shirt, but are not sure if you need white ink, you can select a textile color in the software, and view the finished product in the “TrueView” view box to determine if you want a white underbase. In this example, you can see that the image is too dull to print on a grey shirt without an underbase; therefore, we will need to move to white underbase settings in step 4.

Because our textile color is dark, we will add a white underbase to our print. This will ensure your lighter colors show up as intended. It is typically suggested that users keep the underbase settings in “content based” mode to print a greyscale white pass. This will improve the finished image quality, and will use significantly less ink, saving you money.
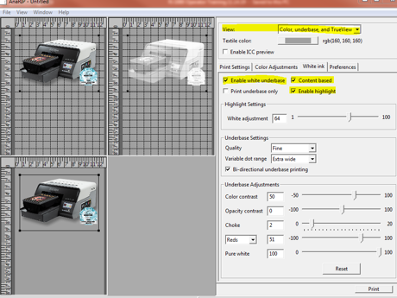
Go to the “White ink” tab in AnaRIP. Check the box marked “Enable white underbase.” Then change your view to “Color, Underbase and TrueView.” This will give you three views, the graphic input (color view), the white underbase view and the finished simulated view or “TrueView.”

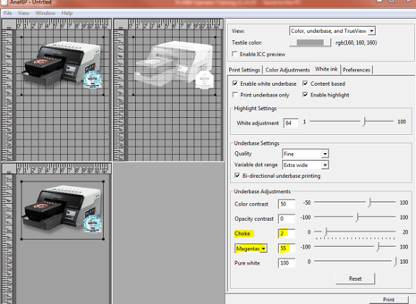
Any changes will be made in the “White Ink” tab. Here you can adjust the following settings:
“Highlight” to add white ink during the color pass which highlights any bright white in the graphic.
You can choke the white underbase so that you avoid a white outline on your finished print.
Increase the amount of white ink under dark colors like reds, blues and greens. We recommend that in underbase adjustments, select each drop down and increase the amount of white ink for reds, magentas, greens, blues and cyans be increased to “55.” It is not necessary to change the number for greys and yellows.

Step 6 : Time to Print
Now that your settings are dialed in, hit PRINT to send the graphic to the printer! Grab your shirt and pre-press the garment if you are using white ink. We suggest ~20 seconds with firm (Standard) pressure on your heat press. This will flatten the print area and ensure the fibers of the garment do not disrupt the finished quality. Put the shirt on the platen and push the print button on the printer. You will notice that after these changes, your white ink pass has slightly more ink improving the vibrancy of the finished product.
DTG Connection has a more in-depth training available for all the AnaRIP features. We can provide advanced instruction on the “Color Adjustments” tab which allows you to adjust colors and even remove backgrounds. If additional instruction is needed, you can email info@dtgconnection.com or wait for Part 2 (Coming soon!).
whats the difference on the CMYK profile from the power bright to the SWOP? Im still new to the Ri1000 im not familiar with this setting
PowerBright is a legacy profile that is used on older AnaJet printers. We recommend sticking with the SWOP profile for the Ri 1000 printer.
How much are your machines?
We have an amazing special this month that includes a free heat press and free shipping. Please fill out the form on this page and we will have a representative contact you and put together a custom quote for you. https://dtgconnection.com/request-information/